
To migrate cluster storage for a SQL Server failover cluster, swap the disks and keep every drive letter. If the new disks take over the old drive letters, nothing else has to change. No database, no job and no connection string needs an edit. The only long downtime is the file copy.

Plan the Cluster Storage Swap
A failover cluster instance keeps its data on shared disks. Each disk is a cluster resource, and the SQL Server resource depends on it. You can’t unplug a disk. You add the new disk, move the data, and then tell the instance to use the new disk instead.
The example assumes an old SAN with five disks and a new SAN with five matching ones. The table shows how they map.
| Purpose | Old disk | New disk |
|---|---|---|
| Quorum witness | Q: | L: |
| MSDTC | X: | M: |
| SQL data | R: | N: |
| SQL log | S: | O: |
| tempdb | T: | P: |
The method has two layers. The data disks keep their drive letters, so the instance never notices. The quorum and MSDTC disks are replaced through the cluster’s own wizards. Both are described below, in the order you would run them.
Check What Lives Where
Before the work, list what sits on each volume of the cluster storage. This query groups every database file by drive and type. On the cluster, run it on the instance to confirm that nothing important lives on a volume you forgot.
SELECT UPPER(LEFT(physical_name, 3)) AS Volume, type_desc AS FileType,
       COUNT(*) AS Files, CONVERT(decimal(12,1), SUM(size) * 8 / 1024.0) AS SizeMB
FROM sys.master_files
GROUP BY UPPER(LEFT(physical_name, 3)), type_desc
ORDER BY Volume, FileType;| Volume | FileType | Files | SizeMB |
|---|---|---|---|
| C:\ | LOG | 12 | 4776.0 |
| C:\ | ROWS | 19 | 7088.4 |
| D:\ | FILESTREAM | 1 | 0.0 |
| D:\ | LOG | 9 | 5172.0 |
| D:\ | ROWS | 10 | 6897.6 |
This table is from a development server with two volumes. On your cluster it shows the data, log and tempdb disks. Add up the sizes. The new disks must hold that total plus growth.
The Steps for the SQL Server Disks
Take full backups of all databases first, system databases included. Keep them off the disks being replaced. They are for disaster recovery only, and you won’t need them if every step works.
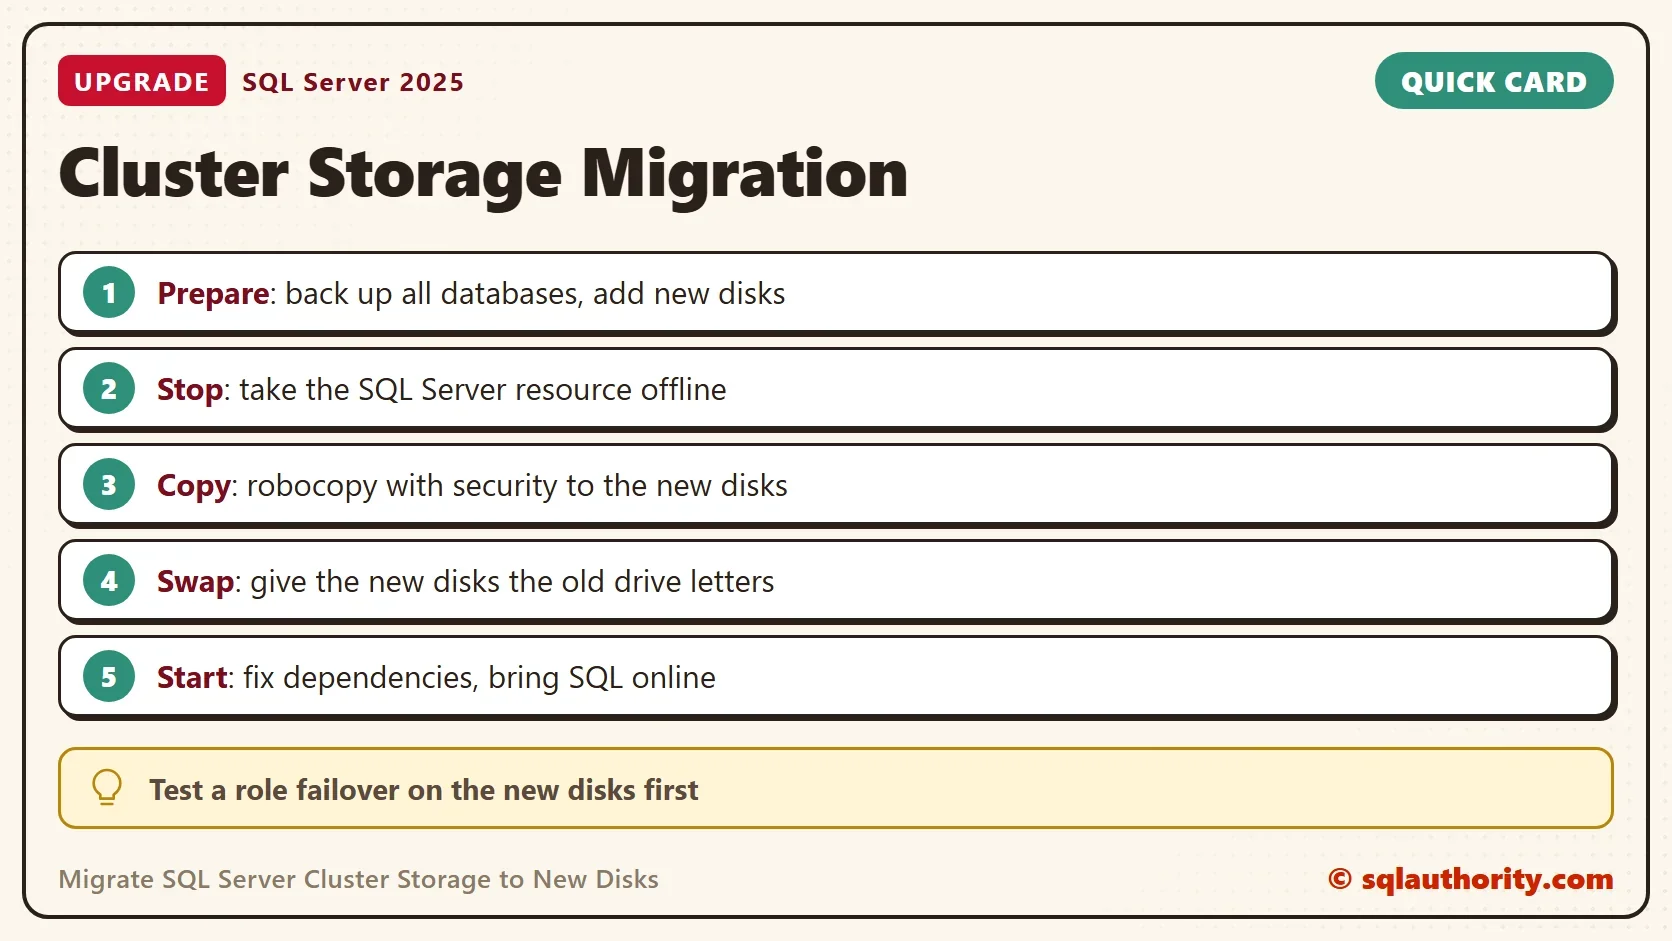
- Present the new disks to every cluster node. In Failover Cluster Manager, they appear under Storage, Disks, as available storage.
- Add them to the SQL Server role. Format them with the same allocation unit size as the old disks, which is a habit, not a rule.
- Test before the cutover. Move the role to the other node and back with the new disks attached. That proves both nodes can reach them.
- Take the SQL Server resource offline in Failover Cluster Manager. Only the node that owns the role runs the instance, so one offline step is enough. Don’t stop the service from the Services console, because the cluster would restart it. Keep the disks themselves online.
- In Failover Cluster Manager, open Roles, the SQL Server role, the SQL Server resource, Properties, and the Dependencies tab. Remove the old data, log and tempdb disks. A dependency tells the cluster not to start the instance until that disk is online.
- Copy every folder from each old disk to its new disk, unchanged. Use
robocopyfrom an elevated prompt, and copy the permissions with the files. - Swap the drive letters. In Disk Management on the owner node, give each old disk a free letter. Then give each new disk the old letter.
- Add the new disks as dependencies of the SQL Server resource. Bring SQL Server online.
- Test the applications. When they pass, remove the old disks from the cluster.
The Copy Step
The copy is where most mistakes happen. The command mirrors a whole disk, and it copies the security settings that the SQL Server service account needs. This is a command for an elevated command prompt, not T-SQL. The instance must be offline when you run it.
robocopy R:\ N:\ /MIR /COPY:DATSO /DCOPY:DAT /R:1 /W:1 /XD "System Volume Information" "$RECYCLE.BIN"
Two cautions apply. /MIR deletes files in the destination that aren’t in the source, so a swapped source and destination destroys data. Add /L the first time. It lists what would happen and copies nothing. And /COPY:DATSO copies data, attributes, timestamps, security and owner. /COPYALL also copies auditing information, and it fails without the Manage Auditing right.
Exit codes below 8 mean success. Code 1 means files were copied. Run the command twice. The second run should copy nothing and return 0, which proves the two disks match.
If the instance fails to start and the error log mentions operating system error 5, the permissions didn’t travel. Compare the folder security on the new disk with the old one, and copy it again.
Other Questions
Mounted folders. A disk that is mounted into a folder needs its host volume in the cluster as well. The host volume is a disk resource, and SQL Server must depend on both.
Less downtime. A SAN can copy or virtualize the old LUN while it stays online. That shortens the outage to a reboot or a failover. If the SAN team offers it, it beats copying files by hand.
Backup and restore, or log shipping. Restore each database to the new disks under a temporary name. Apply a final differential or log backup in the window, and rename. The downtime is short, and every database needs its own steps.
Changing paths with T-SQL. If the new disks use different letters, change the file paths instead. The master database moves through the startup parameters, and the Resource database stays where it is. For tempdb, model and msdb, this query prints the statements for you. It changes nothing. Review the list before you run any of it. The statements change only the catalog, so the files must be in place before the next start.
DECLARE @newFolder nvarchar(260) = N'N:\SQLData\';
SELECT CONCAT(N'ALTER DATABASE ', QUOTENAME(DB_NAME(database_id)), N' MODIFY FILE (NAME = ', QUOTENAME(name),
              N', FILENAME = N''', @newFolder, RIGHT(physical_name, CHARINDEX(N'\', REVERSE(physical_name)) - 1), N''');') AS StatementToReview
FROM sys.master_files
WHERE database_id IN (2, 3, 4)
ORDER BY database_id, file_id;| StatementToReview |
|---|
| ALTER DATABASE [tempdb] MODIFY FILE (NAME = [tempdev], FILENAME = N’N:\SQLData\tempdb.mdf’); |
| ALTER DATABASE [tempdb] MODIFY FILE (NAME = [templog], FILENAME = N’N:\SQLData\templog.ldf’); |
| ALTER DATABASE [tempdb] MODIFY FILE (NAME = [temp2], FILENAME = N’N:\SQLData\tempdb_mssql_2.ndf’); |
| ALTER DATABASE [tempdb] MODIFY FILE (NAME = [temp3], FILENAME = N’N:\SQLData\tempdb_mssql_3.ndf’); |
| ALTER DATABASE [tempdb] MODIFY FILE (NAME = [temp4], FILENAME = N’N:\SQLData\tempdb_mssql_4.ndf’); |
| ALTER DATABASE [tempdb] MODIFY FILE (NAME = [temp5], FILENAME = N’N:\SQLData\tempdb_mssql_5.ndf’); |
| ALTER DATABASE [tempdb] MODIFY FILE (NAME = [temp6], FILENAME = N’N:\SQLData\tempdb_mssql_6.ndf’); |
| ALTER DATABASE [tempdb] MODIFY FILE (NAME = [temp7], FILENAME = N’N:\SQLData\tempdb_mssql_7.ndf’); |
| ALTER DATABASE [tempdb] MODIFY FILE (NAME = [temp8], FILENAME = N’N:\SQLData\tempdb_mssql_8.ndf’); |
| ALTER DATABASE [model] MODIFY FILE (NAME = [modeldev], FILENAME = N’N:\SQLData\model.mdf’); |
| ALTER DATABASE [model] MODIFY FILE (NAME = [modellog], FILENAME = N’N:\SQLData\modellog.ldf’); |
| ALTER DATABASE [msdb] MODIFY FILE (NAME = [MSDBData], FILENAME = N’N:\SQLData\MSDBData.mdf’); |
| ALTER DATABASE [msdb] MODIFY FILE (NAME = [MSDBLog], FILENAME = N’N:\SQLData\MSDBLog.ldf’); |
Move the model and msdb files first. With the instance stopped, copy them to the new folder. Give the service account full control of that folder. Missing model files mean SQL Server can’t create tempdb, and the instance can fail to start. Missing msdb files mean msdb fails to open. The tempdb files are created at startup, so tempdb only needs the folder to exist.
The Quorum and MSDTC Disks
Replace the quorum witness in the Configure Cluster Quorum Settings wizard. Choose a disk witness, pick the new disk, and finish. A file share witness or a cloud witness is also possible and needs no disk at all.
The simplest way to move MSDTC is to rebuild it. Remove the clustered MSDTC role, then create it again with the Configure Role wizard. Pick Distributed Transaction Coordinator, name it, and select the new disk.
Is the Swap Riskier Than T-SQL?
You could argue that a drive letter swap is riskier than changing paths in T-SQL. It touches the cluster more, and it touches SQL Server less. For many databases and one outage window, that is the better trade.
What to Remember
Run the whole cluster storage plan on a test cluster first. Keep the old disks until the applications have passed their checks.
A storage migration is not a copy job, it is a promise that nothing will notice.
Published by Pinal Dave on SQLAuthority. More of my work at pinaldave.com.
Discover more from SQL Authority with Pinal Dave
Subscribe to get the latest posts sent to your email.




14 Comments. Leave new
Thanks, what will be the case if drives are mounted? is there any extra steps we need to take care.
You need to take care of mounted drive,
thats the most compicated way i could think of…
the way we use to do that:
disks from old storage get virtualized through new storage.
change zoning and reboot server and update storage driver if necessary
assign correct drive letters to “new” disks
copy disks on storage side from old to new storage
done with nearly no downtime…
To copy data, we need to shutdown SQL.
Before we can copy file mdf, do we need first stop role sql server in cluster manager then stop sql server instance service in 2 node. so sql service need to stop in both node before copy file. is that right?
wheter is that pasive active cluster ir active active cluster, is that right, please advice
I work a lot with SAN storage, I recommend that after you add the new drives to the Windows cluster, you add them to a test group and test moving the group from server to server. This can be done without impacting a production system.
I am not a SAN expert. Thanks for the comment.
Hi Pinal,
Yes, this is most preferred method. I have used this method number of time and it never fail me.
For copying the data I would use robocopy /MIR + I would run robocopy /SEC /SECFIX just to make sure that the security is set correctly. security should not be an issue if you place data in dedicated folders (ie. D:Datadbfile.mdf instead of D:dbfile.mdf) since the ACLs are with the folder which should be moved as a whole. To move the system databases this can be achieved with the alter database modify file (name, filename) command except master which can be moved by changing the proper startup parameters (or the registry keys if you wish) and moving the files (mdf, ldf) while the role is offline.
Perfect! You are awesome!
Dear Pinal!
This is a great tutorial but I have a question:
How can I remove the drive letters pointing to the old storage from the SQL Server dependencies using the Failover Cluster Manager? Can you please give me a detailed explanation?
Thank you!
Kind regards,
Attila
Is great , but to have the least time offline to the database I made a backup full / restore on new disks (database with alternative name). In the “work window” a differential backup/restore o. Then I rename the databases.
Other ways is mirroring database.
saludos!
What is this SQL Server dependencies mean exactly?
Also before making sqlserver offline, shouldnt we give command ” alter database modify fle” to the new location?
what do you mean by step 5 Take SQL Server Resource to an OFFLINE State.
please more detail,
do I need just stop sql server role service in cluster manager, no need stop sql server instance service in active node.
please advice