In the previous article I wrote about comparing two Windows Azure, SQL databases using free community version of ApexSQL Diff. In this article we will write about comparing data in two Windows SQL Azure databases using a free Community version of ApexSQL Data Diff – a tool for SQL data comparison and synchronization.
Same way as in ApexSQL Diff, in ApexSQL Data Diff there is no difference in comparing SQL Server and SQL Azure databases.
In the Project dialog choose the Database as the destination and source and choose the Azure server.
You can additionally filter and map objects using advanced features so that only specific objects would be included in the comparison. When all that is set and done, you can begin with comparing objects.

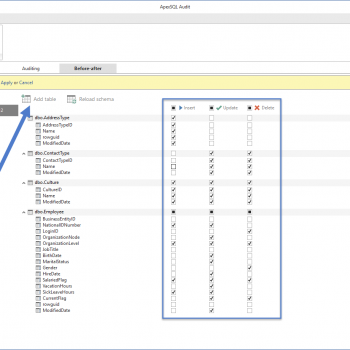
Using the Advanced tabs you can filter database objects using the Object filter feature. You’ll get a list of objects for comparison to select/deselect objects that you want to compare.

After the SQL data comparison is done, compared objects are displayed in the easily accessible results grid. Each compared object is shown, with basic information and a number of differences in data between two compared objects. Also, you can see row level difference details in the difference details pane, which allows synchronization of specific rows.

One of the options for displaying certain objects in results grid is inline row filter. To use this option it’s necessary to go to the View tab, and to select a filter row in the show panels group. An inline row filter is used for filtering compared objects based on different information, object name, total rows, or schema.
Using the Grouping option will group compared objects by object type. Multi column sorting is used for sorting results by individual columns, by clicking each column header. One more option is filtering by different type which is located at the bottom of results grid. Filtering by difference type is present only different, identical, or incomparable objects in the results grid.
To synchronize detected differences user can select specific objects, from result grid, for synchronization, or he can select all objects by going to results group in the home tab, and clicking on check all.

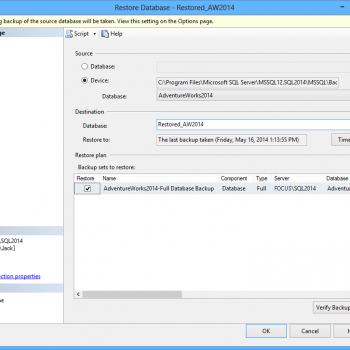
The Synchronization wizard will start, and setting up is consisted of three steps. Selecting the data source that will be changed is the first step of choosing the synchronization direction. Synchronization wizard is giving an option to reverse the process as it is shown on the picture bellow.

The next step is selecting an option how to process synchronization script. User can perform two output actions: creating a synchronization script, or synchronizing a database. The script can be saved to file by choosing folder and file name. One of the options is to open script in editor and choosing where to show synchronization script.
Summary and warnings is the final step, where you can preview the impact of synchronization script. A detailed list of actions that will be taken through synchronization process is shown, along with potential problems that might occur during synchronization. List of actions can be grouped in a three ways: 1) by execution order, 2) by object, 3) by action type.

After selecting creates script a window of the batch data synchronization script will appear, and all synchronization data can be seen.

Like in ApexSQL Diff, in ApexSQL data Diff you can create comprehensive reports based on obtaining differences by selecting format in the home tab, under action group, and choosing export. There are three ways to export results: HTML plain report, HTML report, and CSV data export

An HTML report is interactive and user-friendly format that allows easy navigation, expand/collapse regions containing table/view information.

Remember that this tool is free for all who are Windows Azure SQL Databases. More information can be found on their company blog Solution Center. As a matter of fact, there are plenty solutions for various problems related to SQL Server, you might want to take a look.
Reference: Pinal Dave (https://blog.sqlauthority.com)